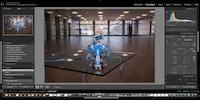
Product test
Lightroom: ways out of the subscription plan
by David Lee
Affordable photo software without a subscription that can do everything you need: At first glance, Affinity Photo appears to be the solution for anyone who wants to get away from Adobe Photoshop Lightroom. However, at least for me, this is not the case.
I would like to get away from Adobe Lightroom. But if I switch, I'll lose my editing settings and have to familiarise myself with new software. This step is only worth it if I find a really good alternative.
Over the past few months, I've downloaded and installed trial versions of Capture One Pro, DxO Photo Lab and Affinity Photo. Since RAW converters are very complex and everyone has different priorities, I advise you to test for yourself if you are looking. But wait with the installation until you have time for it. You can test Capture One Pro and DxO PhotoLab for 30 days, Affinity Photo for 10 days and Lightroom for 7 days.
Capture One Pro makes a very professional impression, but requires a long familiarisation period. I don't achieve better results with it than with Lightroom, but that could also be because I know Lightroom much better. In any case, Capture One Pro doesn't excite me enough to pay a whopping 333 francs for the cheapest version of the software. DxO PhotoLab costs considerably less at 129 euros, is solid and quite easy to use. However, it can only open DNG files if it can also open RAW files from the same camera. For me, this also rules out the software.
That leaves Affinity Photo. The software attracts users with an attractive price of 48 francs. The range of functions is impressive. But it is no substitute for Lightroom.
Photoshop and Lightroom follow different concepts. Photoshop only edits individual images, while Lightroom allows you to keep an eye on the entire photo series and manage large image sets. Photoshop has significantly more image editing functions. For example, you can work with layers there.
The concept of Affinity Photo is similar to Photoshop, not Lightroom. You only ever edit individual images. It is not possible to apply development presets to entire image series, and the software does not offer any management functions. However, Affinity Photo would work well in combination with the free Adobe Bridge programme for precisely this reason.
There are text tools and a spelling corrector in Affinity Photo. You can draw and paint. You can draw hearts, arrows and speech bubbles and change their shape. Create flyers or greeting cards. You can even open and export Photoshop files, even if not everything is imported.
These are all things you don't need if you're looking for a Lightroom replacement.
Affinity Photo and Photoshop work very similarly at first glance. Both have a module that can open and edit RAW files. This module locks the other functions. You must first exit develop mode, i.e. finish developing the photo, so to speak, before you can open it in the "normal" programme.
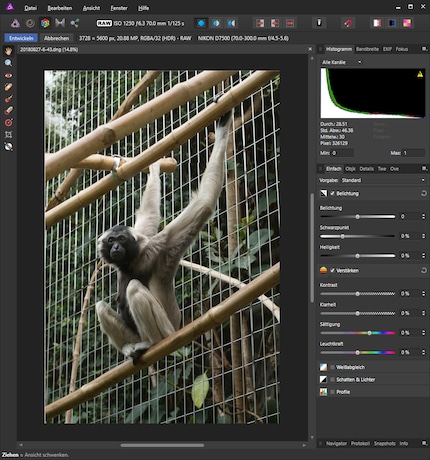
However, there are significant differences. In Photoshop, you can save your editing settings without opening the image in normal mode. You simply click the "Done" button at the end. In Affinity, however, all adjustments are lost if you don't open the image afterwards.
There are no automatic corrections in Affinity Photo's development mode. For example, the software calculates the ideal white balance or exposure for me. To do this, I have to leave the develop mode. When I do this, I have buttons for auto corrections.


The buttons do not always have an effect. Affinity Photo has probably already adjusted the image automatically. Or has it not? I don't know because Affinity Photo doesn't tell me what it's doing. Let's take the white balance as an example. In Photoshop or Lightroom, the image is opened by default with the settings supplied by the camera. The camera has determined that the perfect white balance for a photo is 4800 K and the green-magenta balance is +8. This is displayed with the note: "As shot". Now I can switch to "Automatic" and get Lightroom to calculate the ideal value itself.
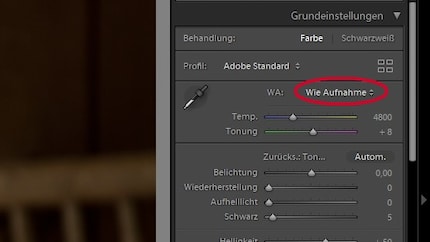
In Affinity Photo, a value is displayed that corresponds approximately to the capture value, but not exactly. In this case it is 4847 K and 0 on the green-magenta scale. I can't choose between automatic or camera setting, so I'm not sure what's going on here. I don't even know whether this is a bug or whether the manufacturer intended it that way. If it is intentional, I would like to know what the idea behind it is.
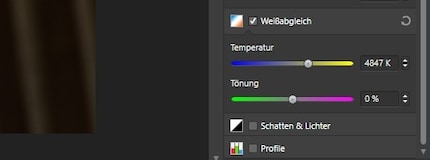
And something else makes me wonder. When I leave the development mode and return to it, the white balance only shows plus and minus values, just like a JPEG. I've already gone into detail about what this means. In short, Affinity Photo converts the image from RAW to something that is not RAW.
A normal RAW converter like Lightroom or Capture One Pro leaves the RAW file untouched and only saves the settings you make. This requires very little storage space as no new image files are saved unless you export something. Each time you reopen the RAW file, these settings are also read in and the image is presented to you as it looks with the settings applied.
Affinity Photo works in a fundamentally different way. It does not save any RAW settings. To make changes, it forces you to convert the RAW image into an image with the file extension .afphoto and save it again. Both the image itself and your settings are saved in this file. And these files are huge. A 20 MB RAW file will be around 250 MB in size.
If you create a second version of the photo, you need to create a second 250 MB file. Lightroom does not need a new image file for this. You create a virtual copy with separate settings. This concept is much quicker and more flexible.
I don't understand why Affinity Photo has reinvented the wheel and cut a few corners in the process.
For me, the most important reason for shooting in RAW is to have more leeway when balancing out areas that are too dark and too light. Correcting the highlights is more difficult than the shadows. Lightroom does this brilliantly. If I'm looking for an alternative RAW converter, then I want one that can do this just as well. So I'll test that first.
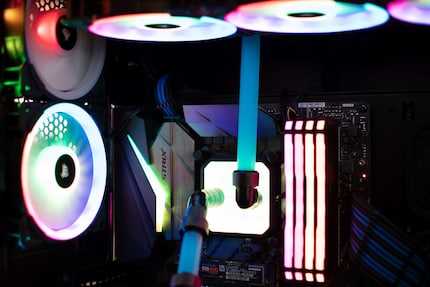
This image shows extreme differences in brightness - perfect for an endurance test. The RAW converter has to darken the bright areas and lighten the shadows to create a harmonious image.
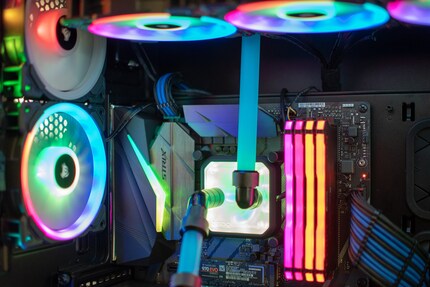
Lightroom automatic: This is what happens when I use the automatic correction for white balance and tonal correction in Lightroom. Time required: Two seconds. Result: acceptable. Lettering and shading are now recognisable in the brightly lit square. The darkening has brought out hidden details.
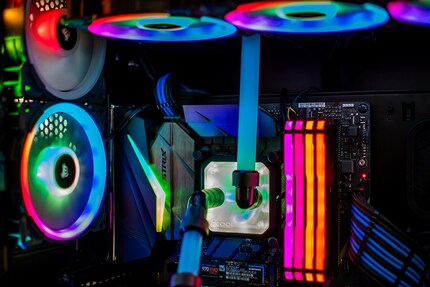
Lightroom manual: The automatically generated image is a little too bright and dull for me, I would like it to be brighter. I adjusted it satisfactorily with another 30 seconds of employees. The details in the bright areas are even easier to recognise.
Capture One Pro automatic: Exposure, HDR, tonal values and white balance automatically corrected - it's a bit more complicated, but it's also quick and easy and the result is okay. Capture One is a little more cautious than Lightroom. Lightroom did a better job with the colours for my taste, but I can easily readjust that.
Capture One Pro manual: Capture One Pro also allows less extreme interventions than Lightroom. Nevertheless, the result is impressive. The details in the light and dark areas come out clearly.
Affinity automatic: There is no auto correction in develop mode. Therefore no image.
Affinity manual: When I turn down the highlights, Affinity Photo simply turns white areas light grey. But the details don't come back. The software is not capable of darkening the highlights in a meaningful way.
If I turn down the exposure, the highlights slider has no effect at all. So I can turn the sliders as much as I like - all the software does is colour white areas grey.
This happens with all images where highlights need to be corrected. Even if the effects are not always so drastic: Affinity Photo is not very helpful for darkening.
In general, my tip is: Don't just pay attention to whether a RAW editor has a certain function. But also how this function works. In my opinion, a RAW converter is only useful if you can achieve better results with it than the camera does when it creates JPEGs directly.
Another important point with RAW images is image sharpening and the removal of image noise. These things work against each other: sharpening means emphasising small details. Noisy pixels are small details. Conversely, noise removal means that details that you actually want to retain also disappear. The software therefore tries to separate noise and details by recognising edges. As an image editor, you always have to keep an eye on both at the same time.
Let's see which software is best at sharpening the image and keeping noise in check at the same time.
The spotless dirty vulture at Zurich Zoo is the guinea pig. I took the picture at 2200 ISO, so the image has a medium level of noise.
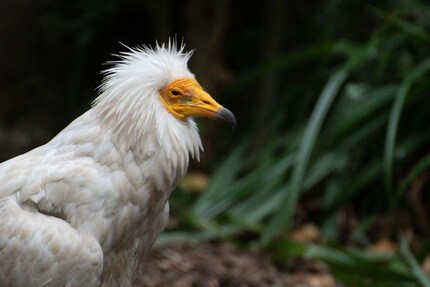
RAW photos always need to be sharpened a little. When opening a new photo, a more or less strong sharpening is therefore already preset. You can adjust these default settings in Lightroom and Capture One Pro. Depending on the respective camera model. This is not possible in Affinity Photo. You can save your own presets, but the default always remains the same.
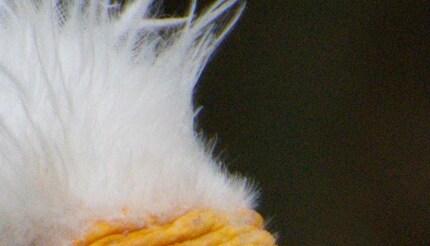
Affinity Photo on opening: The default settings sharpen the image properly. In the dark area, however, the noise is also disturbing.
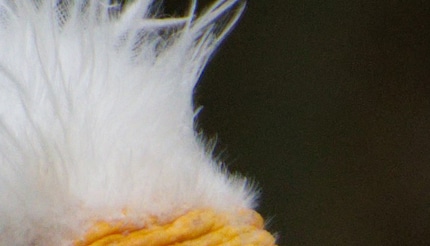
Affinity Photo corrected: With manual correction, I can significantly reduce the noise - but I can't manage to make the image optimally sharp at the same time.
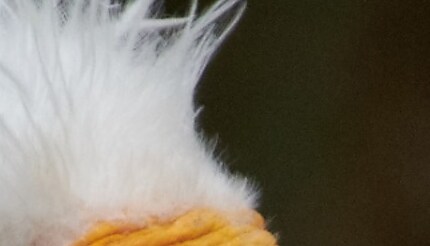
Capture One Pro when opening: The default settings when opening already reduce the noise quite significantly. Sharpening is only done very carefully.
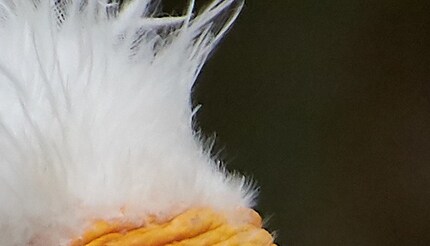
Capture One corrected: I turn up the sharpness accordingly. I only increase the noise reduction slightly. Because even with strong sharpening there is only a little disturbing noise. The bottom line is that I quickly get an acceptable result.
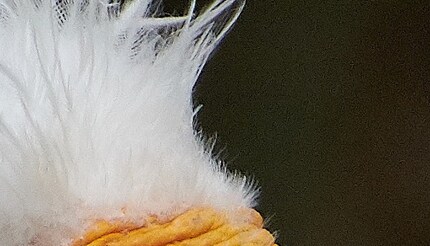
Capture One Details: Only when I sharpen massively and at the same time increase the details in the noise reduction, there are unwanted effects. But the image becomes ultra-sharp.
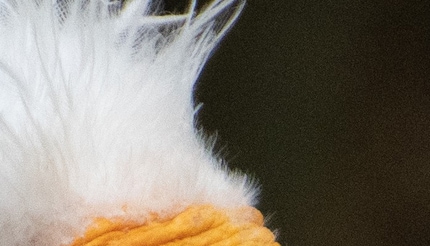
Lightroom on opening: Lightroom suppresses the colour noise in the presets, but not the brightness noise and applies a medium sharpening.
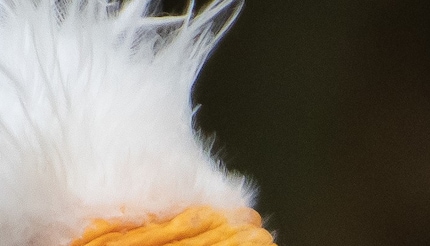
Lightroom corrected: As always, the noise increases when I sharpen the image. However, Lightroom creates a noise that I find very pleasant. Almost like film grain. I therefore have few inhibitions about turning up the sharpening control.
Affinity Photo is not bad software, but it is not what it is advertised to be. On the website, manufacturer Serif advertises it as "professional photo editing software" and "the outstanding choice for professionals". In my eyes, it's more of a package for hobby designers and photo editors. Photoshop Elements.
In terms of concept alone, Affinity Photo is not a replacement for Lightroom. The application forces you into a cumbersome workflow that is unsuitable for large volumes of images, requires a lot of storage space and is not very flexible. The development mode is also not at a professional level. Highlight correction in particular is disappointing.
Even though Adobe doesn't exactly treat its customers like kings, I'm sticking with Lightroom for the time being. I have nevertheless bought Affinity Photo. Just to see if my Photoshop tips also work with Affinity Photo. <p
My interest in IT and writing landed me in tech journalism early on (2000). I want to know how we can use technology without being used. Outside of the office, I’m a keen musician who makes up for lacking talent with excessive enthusiasm.